Quick Start-Guide: Add an AI Chat Bot to a Vaadin + Spring Boot Application Flow
- Prerequisites
- 1. Start from a Vaadin Spring Skeleton
- 2. Add Spring AI dependencies
- 3. Configure Your OpenAI Credentials
- 4. Enable Vaadin Push
- 5. Build the Chat UI with the AI Orchestrator
- 6. Run & Iterate
- What You Built
- Next Possible Steps
- Troubleshooting
- Complete File List Recap
|
Note
|
Preview Feature
This is a preview version of AI integration features. You need to enable it with the feature flag |
This guide shows how to connect a Large Language Model (LLM) into a Vaadin application using Spring AI, Spring Boot, and the AI integration features. You’ll build a minimal chat UI with MessageList and MessageInput, stream responses token-by-token, and keep a conversational tone in the dialog with the AI — all without writing boilerplate wiring code.
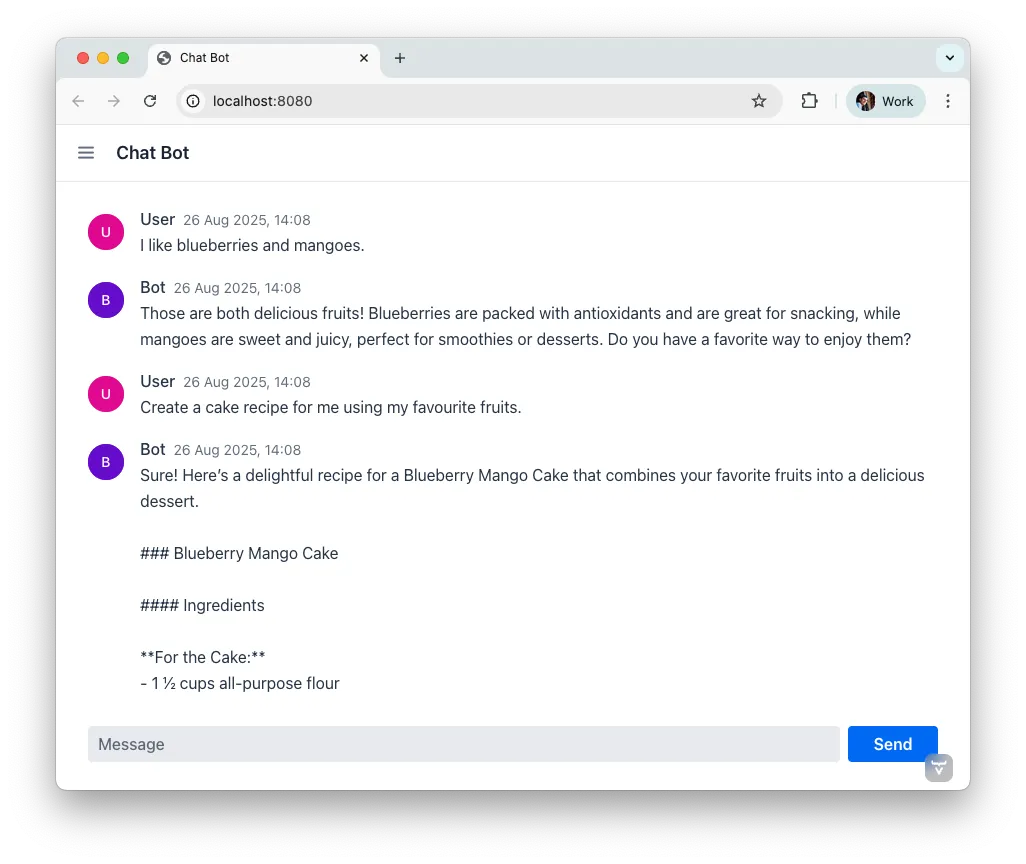
Audience & style: This quick guide is for Java developers and Vaadin beginners, as well as AI rookies. The sample application is implemented in Spring style and explains in small, practical steps how to integrate AI into Vaadin. Code snippets are available for copy and paste.
Prerequisites
-
An OpenAI API key (
OPENAI_API_KEY) -
The
com.vaadin.experimental.aiComponentsfeature flag enabled, as the AI integration features are still a preview. Enable it in Copilot’s experimental features tab, or addcom.vaadin.experimental.aiComponents=truetosrc/main/resources/vaadin-featureflags.properties. Without it, the first prompt fails.
1. Start from a Vaadin Spring Skeleton
Download a Vaadin Spring starter from GitHub, import it into your preferred IDE, and get it running in your environment.
Pro Tip: Starting the application with Hotswap Agent improves your development lifecycle.
Start with a cleaning and remove the default service GreetService and clear the existing UI content. You’ll implement everything in MainView.
2. Add Spring AI dependencies
Add the Spring AI BOM and the OpenAI starter to import the necessary dependencies to your project. The BOM takes care of all Spring AI dependencies and provides the consistent version numbers to each sub dependency automatically.
Maven (pom.xml):
Source code
XML
<dependencyManagement>
  ...
  <dependencies>
    <dependency>
      <groupId>org.springframework.ai</groupId>
      <artifactId>spring-ai-bom</artifactId>
      <version>2.0.0-RC2</version><!-- use the latest stable -->
      <type>pom</type>
      <scope>import</scope>
    </dependency>
  </dependencies>
  ...
</dependencyManagement>

<dependencies>
    ...
    <!-- OpenAI LLM via Spring AI -->
    <dependency>
        <groupId>org.springframework.ai</groupId>
        <artifactId>spring-ai-starter-model-openai</artifactId>
    </dependency>
    ...
</dependencies>
(Gradle users: import the Spring AI BOM and add the same starters.)
3. Configure Your OpenAI Credentials
To access the API of OpenAI you need a license key. The preferred way to provide the key is through an environment variable, as this makes it available to other applications as well. After setting the environment variable on your system, refer to it from application.properties like this:
Source code
properties
spring.ai.openai.api-key=${OPENAI_API_KEY}
# Optional: pick a model; adjust to what your account supports
# spring.ai.openai.chat.options.model=gpt-5
Tip: use Spring profiles or your CI/CD’s secret store for the key.
4. Enable Vaadin Push
To prevent end-users from sitting in front of a blank screen waiting for a response, you’ll stream tokens asynchronously and update the UI live with response tokens. To do this, you need to enable server push:
Source code
Java
// src/main/java/org/vaadin/example/Application.java

import com.vaadin.flow.component.page.AppShellConfigurator;
import com.vaadin.flow.component.page.Push;
import com.vaadin.flow.router.PageTitle;
import org.springframework.boot.SpringApplication;
import org.springframework.boot.autoconfigure.SpringBootApplication;

@PageTitle("AI in Vaadin")
@SpringBootApplication
@Push
public class Application implements AppShellConfigurator {

    public static void main(String[] args) {
        SpringApplication.run(Application.class, args);
    }
}
5. Build the Chat UI with the AI Orchestrator
The AI Orchestrator connects your UI components to the LLM. It handles message display, token streaming, conversation memory, and UI updates automatically. You don’t need to write a separate service class — the orchestrator manages the Spring AI integration directly.
Use MessageList to render the conversation and MessageInput for user prompts. Then wire everything together with the orchestrator’s builder:
Source code
Java
// src/main/java/org/vaadin/example/MainView.java
package org.vaadin.example;

import com.vaadin.flow.component.Composite;
import com.vaadin.flow.component.ai.orchestrator.AIOrchestrator;
import com.vaadin.flow.component.ai.provider.SpringAILLMProvider;
import com.vaadin.flow.component.messages.MessageInput;
import com.vaadin.flow.component.messages.MessageList;
import com.vaadin.flow.component.orderedlayout.VerticalLayout;
import com.vaadin.flow.router.Menu;
import com.vaadin.flow.router.PageTitle;
import com.vaadin.flow.router.Route;
import com.vaadin.flow.router.RouteAlias;
import org.springframework.ai.chat.model.ChatModel;
import org.vaadin.lineawesome.LineAwesomeIconUrl;

@PageTitle("Chat Bot")
@Route("")
@RouteAlias("chat-bot")
@Menu(order = 0, icon = LineAwesomeIconUrl.ROBOT_SOLID)
public class MainView extends Composite<VerticalLayout> {

    public MainView(ChatModel chatModel) {
        // Create UI components
        var messageList = new MessageList();
        messageList.setSizeFull();
        // LLMs answer in Markdown; render it as rich text
        messageList.setMarkdown(true);
        var messageInput = new MessageInput();
        messageInput.setWidthFull();

        // Create the LLM provider
        var provider = new SpringAILLMProvider(chatModel);

        // Wire everything together
        AIOrchestrator.builder(provider,
                        "You are a helpful assistant.")
                .withMessageList(messageList)
                .withInput(messageInput)
                .build();

        // Add UI components to the layout
        getContent().addAndExpand(messageList);
        getContent().add(messageInput);
    }
}
The orchestrator takes care of:
-
Displaying messages: user prompts and assistant responses appear in the Message List automatically.
-
Streaming output: tokens are pushed to the UI as they arrive from the LLM.
-
Conversation memory: the provider maintains a 30-message context window, so the assistant remembers earlier messages.
-
Sticky scroll: the Message List keeps the latest answer in view.
Markdown rendering is not one of them: the Message List renders plain text by default, and the orchestrator doesn’t change that. Since LLMs answer in Markdown, call setMarkdown(true) on the list — as above — so that lists, code blocks, and links come out as rich text instead of raw syntax.
What You Built
-
A production-ready chat bot using Vaadin’s AI integration features
-
Token-by-token streaming with Vaadin Push
-
Conversation memory managed by the LLM provider
Next Possible Steps
-
Customize the system prompt to steer the assistant (e.g., tone, persona).
-
Add file attachments with
UploadManagerviawithFileReceiver(). -
Support tool calls via
withTools(). -
Persist conversation history via
ResponseListener. -
Let users populate a Grid from your database in natural language with AI-Powered Grid.
-
Let users build and update Charts from your database in natural language with AI-Powered Chart.
-
Let users fill a form from natural-language input or attached files with AI Form Filler.
-
Log prompts/responses for observability.
Troubleshooting
-
No streaming updates? Ensure
@Pushis present and check reverse proxy/WebSocket settings. -
401 Exception from OpenAI? Verify
OPENAI_API_KEYand environment injection in your run configuration.
Complete File List Recap
-
src/main/java/org/vaadin/example/Application.java— Spring Boot +@Push -
src/main/java/org/vaadin/example/MainView.java— AI Orchestrator + Vaadin chat UI -
src/main/resources/application.properties— OpenAI config -
pom.xml— Vaadin + Spring AI dependencies
That’s it — your Vaadin application now speaks AI.